Tag: fitness

  • The 1-2-3-4 Training Program: Day 2

    The 1-2-3-4 Training Program: Day 2

    For more information about this program, click here for the introduction and day one. Here is day three, and here is day four. Very quickly I will remind you that in the 1-2-3-4 training program you will..

    1. Perform one exercise, then rest and repeat until all your sets are completed.
    2. Perform a superset (two exercises in a row with minimal to no rest in between exercises) and repeat until all your sets are completed.
    3. Perform a tri-set (three exercises in a row with minimal to no rest in between exercises) and repeat until all your sets are completed.
    4. Perform a giant set (four exercises in a row with minimal to no rest in between exercises) and repeat until all your sets are completed.

    Day Two: Upper Body (Shoulders, horizontal pulling/back, and all of your traps)

    A1) Push Press: Shoulders (Explosive)

    Exercise substitutions: Push press or push jerk with barbell or dumbbells, explosive landmine press etc.

    Ppp

    Sets: 5
    Reps: 3-5
    Rest between sets: 90 seconds

    Perform the exercise above with 90 seconds rest between sets. Repeat until your sets are completed, then move onto the “B” exercises.

    B1) Seated Dumbbell Overhead Press: Shoulders (Strength/Hypertrophy)

    Exercise substitutions: Handstand push ups, overhead barbell, dumbbell, or kettlebell press, landmine press etc. (standing, seated, or kneeling etc.)
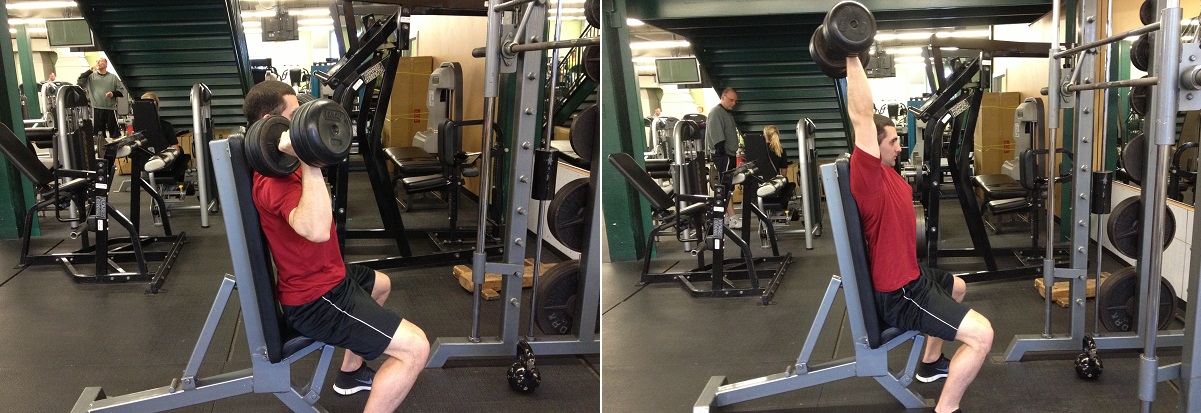
    OHP

    Sets: 4
    Reps: 6-8
    Rest between sets: none go right into B2)

    B2) One Arm Dumbbell Row: Back (Strength/Hypertrophy)

    Exercise substitutions: Any horizontal rowing variation (One arm dumbbell, kettlebell or barbell row, inverted row, cable row variations etc.)

    row site

    Sets: 4
    Reps: 8-10
    Rest between sets: 120 seconds

    Perform the two “B” exercises above in succession. Rest 120 seconds and repeat until your sets are completed. Then move onto the “C” exercises.

    C1) Reverse Fly’s: Rear deltoids (Isolation)

     Exercise substitutions: Rear deltoid raise or reverse fly variations etc.
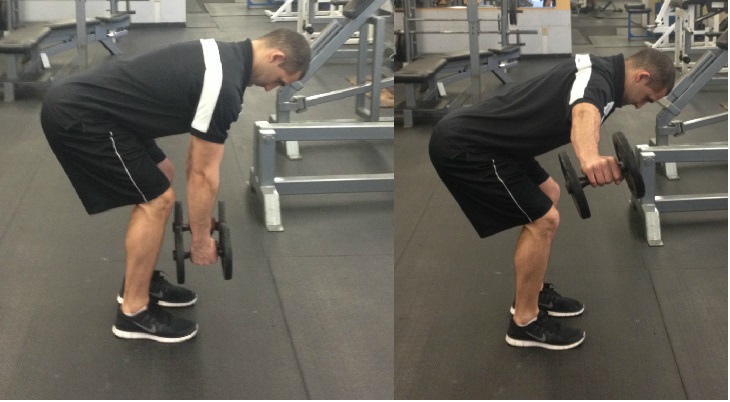
    Rear Delt Raises Bottom

    Sets: 3
    Reps: 12-15
    Rest between sets: None right into C2)

    C2) Dumbbell Side Raises: Middle Deltoids (Isolation)

     Exercise substitutions: Cable  or machine lateral raise variations etc.
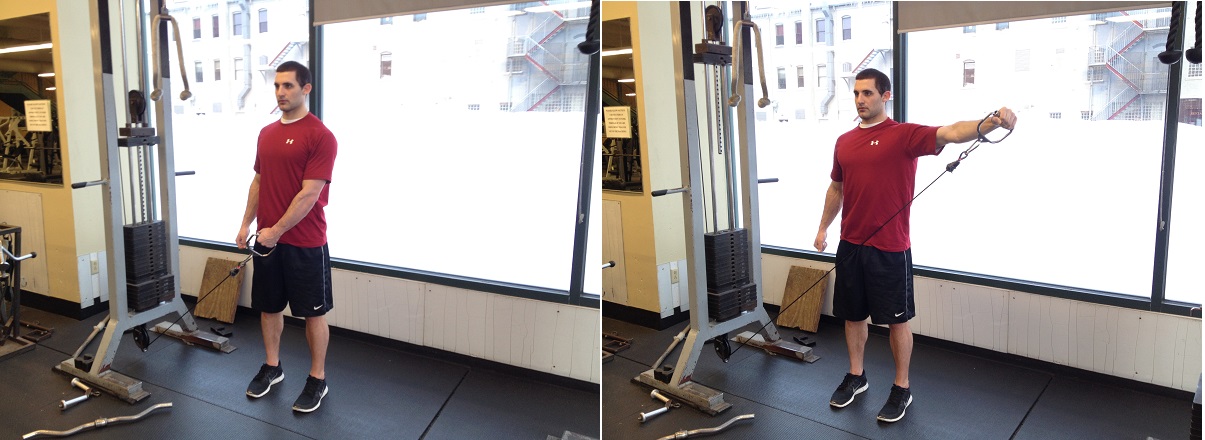
    midel

    Sets: 3
    Reps: 12
    Rest between sets: None right into C2)

    C3) Front deltoids and core (Closed Chain)

    Exercise substitutions: Any movement where hands are on the ground. (Bear Crawls, plank variations, hand walk variations etc.) Don’t underestimate these because they are not your standard anterior shoulder exercise.

    Shulder taps

    Sets: 3
    Timed set: 30-60 seconds
    Rest between sets: 90 seconds

    Perform the three “C” exercises above in succession. Rest 90 seconds and repeat until your sets are completed. Then move onto the “D” exercises.

    D1-D4) Total Trap Take-Down

    D1) Face pulls (10 reps)

    Face pullyyyy

    D2) Y’s thumbs up (Lower traps): 7 reps

    Y's

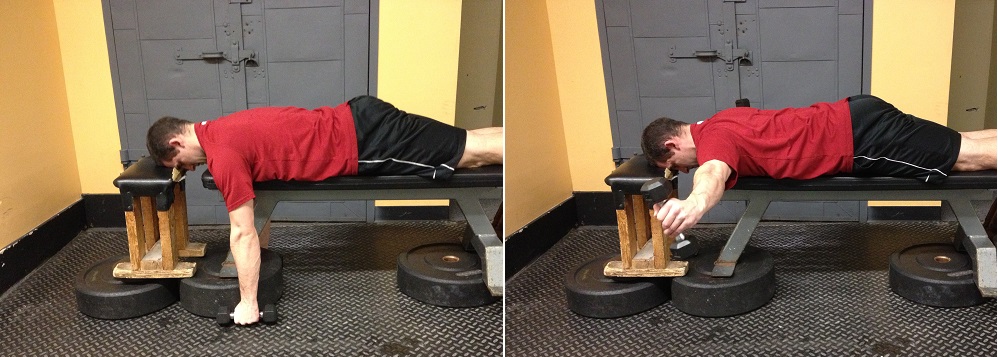
    D3) T’s thumbs up (Middle traps): 7 reps
    T's

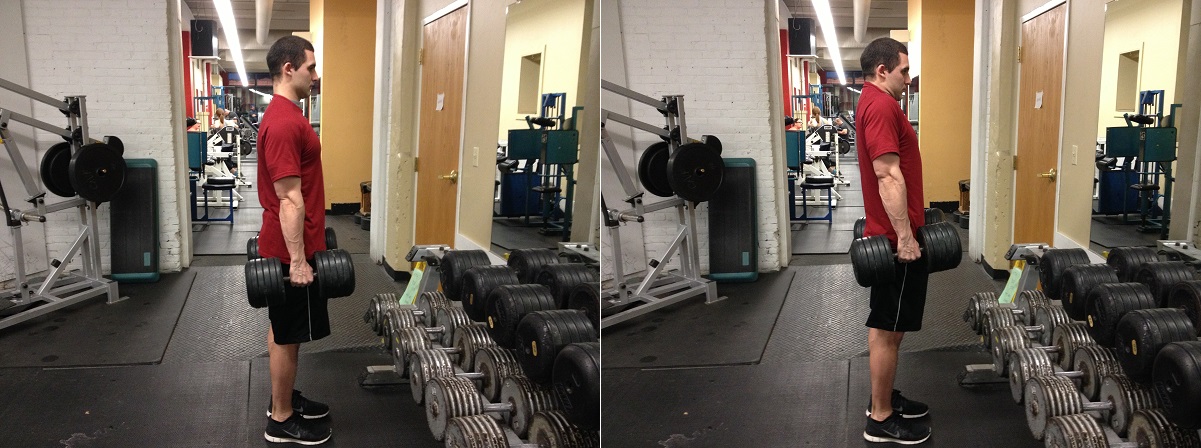
    D4) Shrug variation (Upper traps): (10 reps)
    shurggyys

    Ground rules

    • Perform the recommended amount of reps f0r each exercise.
    • Take minimal to no rest between each exercise.
    • Rest 60 seconds after all 4 exercises are completed.
    • Repeat 1-2 more rounds.

    Finished with day two!

    If you want or need a specific warm up, feel free to do this. It is shown quickly in the video above as well…

    Self massage (5 minutes)

    In general, roll each area for about thirty seconds to two minutes or more. Since I cannot assess you, stay on the areas that need the most work you will stay on the longest. If you have no idea what those are, do this.

    1. Foam Roll Upper Back/Thoracic spine: Or Problem Area #1

    t spine

    2. Foam Roll Lats: Or Problem Area #2

    Foam roll lats

    3. Lacrosse Ball Pecs: Or Problem Area #3

    pecy

    Ultra fast warm up (5 minutes) 

    1. Side lying windmill x7 reps/side

    Side lyng windmill site

    2. Extended or regular front plank to push back x7 reps

    p to p

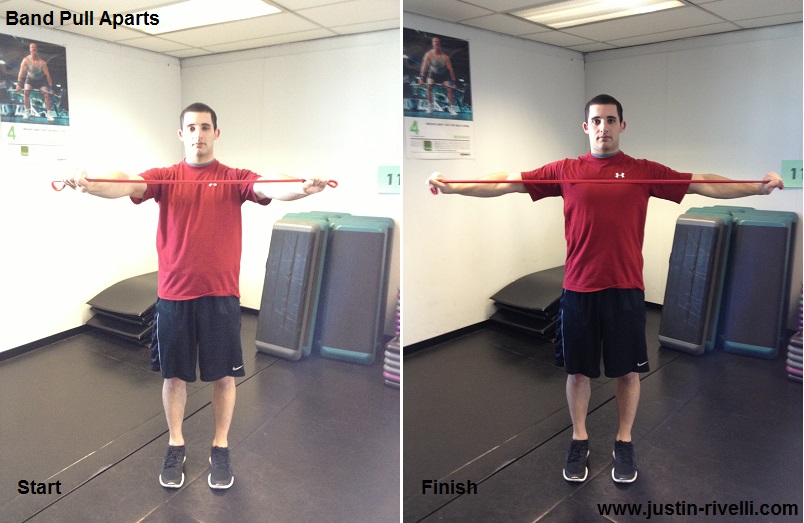
    3. Band pull aparts x7 reps

    BPAAA

    Also note: With each exercise don’t jump right into the weight you will be working with. Gradually increase the resistance with some “warm up sets” before performing and getting into the “working sets”.

    For example let’s use the seated dumbbell overhead press. Let’s also say you have 4 sets of 8 reps assigned. Start with light dumbbells, then grab heavier ones each set. Once you progress to a weight that is challenging for 6 reps, this would count as your first set. Then you would have three more at that weight according to the above protocol.

    Stay tuned for day three! If you missed day one, GO HERE!

  • Lat Pulldowns: How to Make Them More Effective

    Lat Pulldowns: How to Make Them More Effective

    In this post you will learn…

    1. Eight “mistakes” of the lat pulldown.
    2. How to make this exercise more effective.
    3. What a “good” lat pull-down looks like.

    The lat pull-down is an extremely common exercise I see butchered daily. Below you will learn how to make this exercise more effective by generating more tension on the musculature you are aiming too (the latissimus dorsi or the “lats”). Let’s get started.

    EIGHT LESS THAN OPTIMAL WAYS TO EXECUTE THE LAT PULLDOWN

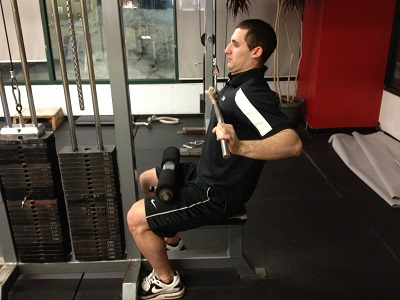
    1.)  The elbows go behind back behind your torso, not towards your back pockets. 

    When you pull your elbows back, the humerus (upper arm) glides forward and causes and excessive amount of stress on the anterior capsule (front) of the shoulder. It also causes an anterior tilt of the scapulae leading to less tension on the musculature we want. The latissimus dorsi or the lats.

    2.) The Chest Caves, The Shoulders Shrug, & Or Your Using Too Heavy Of Weight

    Chest Cav

    This usually happens when you get tired, or the weight is too heavy for you. This can also reinforce problem number one.

    3.) Pulling The Bar Too Low

    Most people don’t even have enough mobility to pull the bar to the chest, forget going any further. By pulling the bar down this far you disengage the lats (the muscles you want to be “working”) and almost automatically make mistake number one mentioned above.

     4.) Excessively Arching The Back & Extending The Ribs

    This isn’t “wrong” but by excessively arching your upper back you switch from primarily using your latissimus dorsi (lats) to using your middle trapezius and rhomboids. Since this exercise is called a lat pulldown, I am guessing most of you would like to know how to maximize the activation of your lats. Over extending your thoracic spine isn’t how you do this.

    5.) Leaning Back (different than arching)

    Again not “incorrect” however, here you are using your HIPS in place of the slight upper back arching (thoracic spine extension) you need to engage the lats. People with poor upper back (t-spine) mobility tend to do this.  By leaning back you also switch from primarily using your lats to using your middle traps and rhomboids.

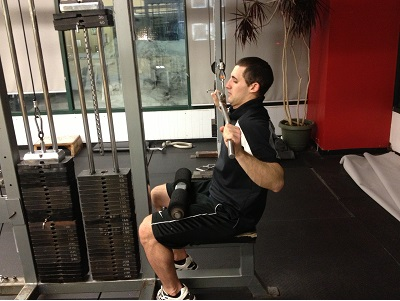
    6.) Pulling The Bar Behind The Head Without Enough Mobility & Excessive Forward Head Forward

    I disagree that the behind the neck lat pulldown is inherently bad, but it’s the application of it that makes it a poor movement.

    You can pull the bar behind your head, but most people lack the required amount of mobility and flexibility to do so. This in turn can be damaging to the shoulder (increase your risk for shoulder impingement and cause damage to the anterior capsule). This exercise also usually reinforces more forward head posture because as you pull down the bar, most people protrude the head forward (see the picture above) to prevent slamming their head during the movement.

    7.) Calling It A Lateral Pulldown!

    Like I have said multiple times already, the primary muscle being used in this movement is the latissimus dorsi. Your not executing anything “lateral” here.

    8.) Not Feeling It In The Right Place

    greeny site 2

    People who perform this exercise can end up feeling it too much in the…

    1. Biceps: There arms take over the movement. This is actually okay if it’s your goal.
    2. Forearms: They curl the wrists. Again, it’s okay if it’s your objective.
    3. Front of the shoulders: They make mistake number one.

    Using less range of motion, changing your grip, holding the correct bottom position, or going lighter can help with this problem. With that said using the cues and techniques I am about to show you usually help you feel this movement where you should be. In your lats.

    MAKING THE LAT PULLDOWN BETTER

    The grip doesn’t matter (underhand, overhand, neutral, wide, narrow, different bars etc.) as the form basically follows the same rules for each.

    Note: If you do notice you cant get into the correct positions below (for example you cant stop your shoulders from rounding forward) you may need some more specific exercise regressions, extra mobility work etc. first.

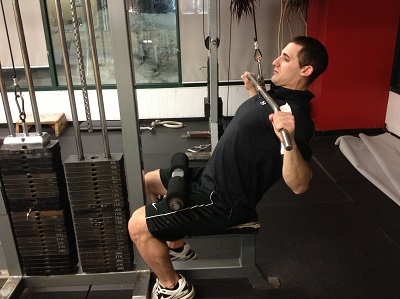
    For The Visual leaner: Here is a picture of a correct lat pulldown.

    photo

    For The Auditory Learner

    Internal cues:

    • Keep your shoulder blades (scapulae) and elbows down.
    • Pull through the outside of your hand (your pinkies).
    • Squeeze your glutes
    • Keep your back straight

    External cues:

    • Stick your elbows and or the top of your shoulders in your back pockets.
    • The top of your head is reaching towards the ceiling.
    • Pinch a penny between your butt cheeks.

    For The Kinesthetic Learner

    I can’t touch you through the computer, Instagram or even Facetime etc., but if I could or if you want a partner to help you, have them…

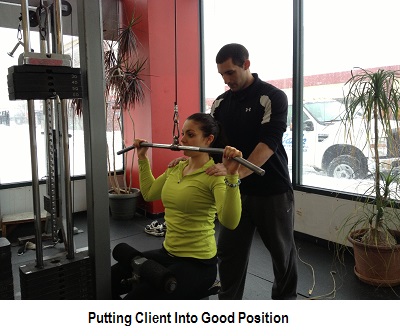
    1.) Put you in a correct position. For one example, if you were shrugging your shoulders (getting no scapular depression) I would push your shoulders down.

    Greeny site

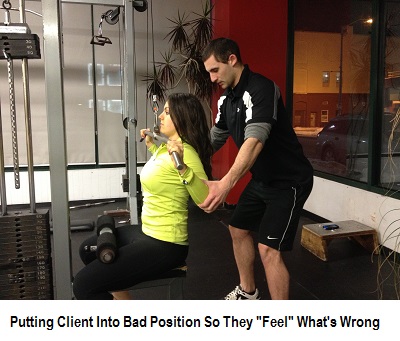
    2.) Exaggerate your poor positioning to an extreme. This way you could feel what is wrong. Then I would have you perform the correct movement by yourself, or with some ” hands on” assistance if necessary.

    HOELbow  bad green

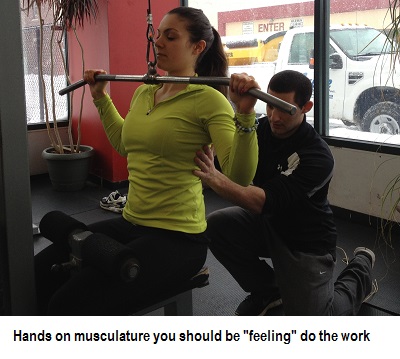
    3.) Hit, touch, or tap on the primary musculature that should be doing the work.  In this case it is the lats (short for latissimus dorsi).

    greeny site 2

    If you’re still not feeling it in your lats you may need to go lighter and hold a fully contracted position for 10-20 seconds. You can do this multiple times a week. Note that this may take a week or two, and even more until you really “get” it.

    One of my Favorite Versions of the Lat Pulldown to Reinforce Good Technique

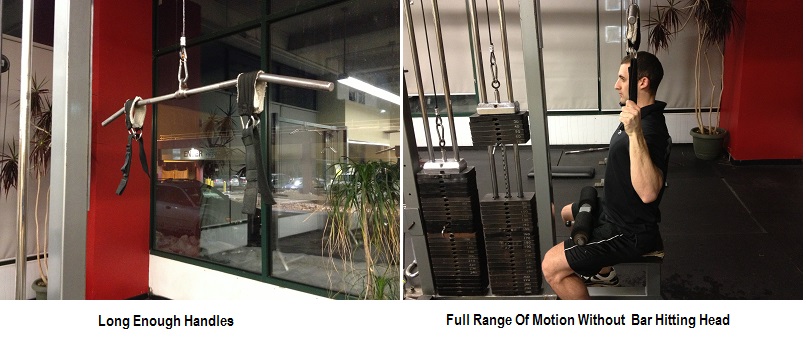
    Try wrapping handles, two sets of straps, etc. around the lat pulldown bar that won’t slide. This allows you to pull the bar straight down, not in front or behind you to minimize things that can go wrong.

    Good position alone

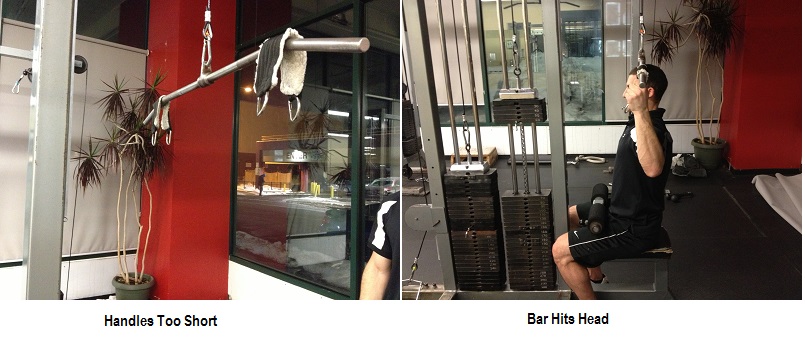
    But be careful, and don’t do this! In the picture below the handles are too short and you can cause some damage to the top of your skull because of this. Note how my elbows can’t come down any further or my head would get crushed.

    To high hit in head alone site

    Instead get some longer handles or tie two sets of straps together etc. and do this. Now the bar won’t bash your head.

    Log Ebough site

    Setting up the exercise like this will ensure the lats are working over other muscle groups like the mid traps.  Now you can pull straight down to your head without going behind the neck, or worrying about all the other mistakes I mentioned that come with keeping the bar in front of you.

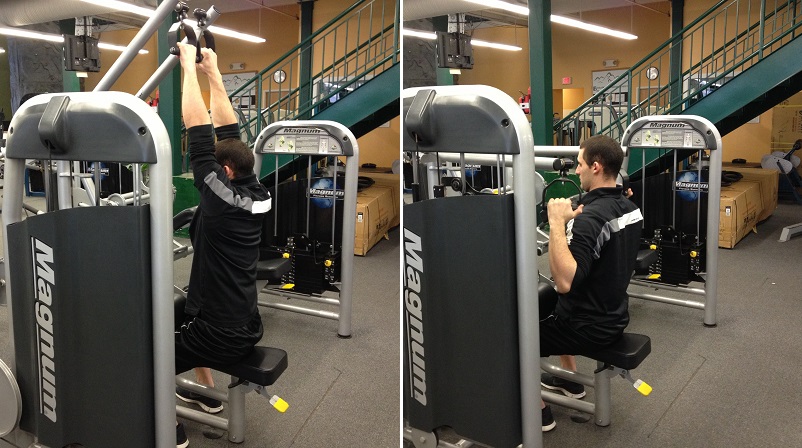
    Just get creative. If you have two pulleys at your lat pulldown machine just simply attach two handles and pull straight down. If you have a machine that you can pull to the side like this, do that.

    Lat pull machine sitey

    Wow.

    This ended up being a lot longer than I expected. Showing you mistakes of the lat pulldown, how to correct them, and demonstrating what good form looks like was my goal. I did this because I just haven’t seen a fully in depth explanation of the lat pulldown presented on one page, in a logical manner in a book or online. Yet. Hopefully I did my job. Feel free to share this post  if it helped you or with someone you think may benefit.

  • Work Your Way Up The Split Squat Scale

    Work Your Way Up The Split Squat Scale

    Like in my work your way up the squatting scale article, this post is straightforward and easy to understand. In it I will explain…

    • How to “level up” your split squats or rear foot elevated split squats (RFESS). By this I mean…
    • If you can perform level one easily and correctly, then you are warranted to move on to level two. If you can perform level two easily and correctly, you are given the right to move onto level three etc.
    • The most common mistakes I see when it comes to performing any split squat variation.

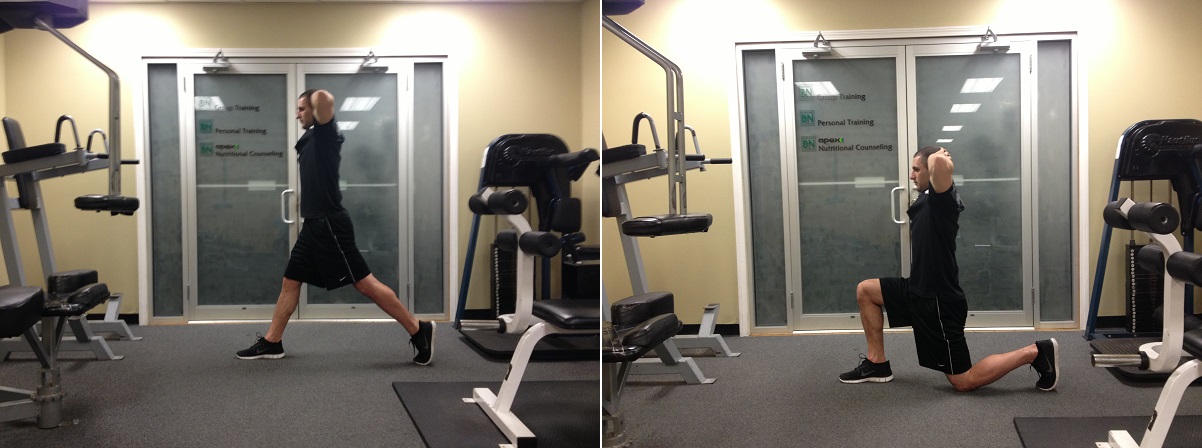
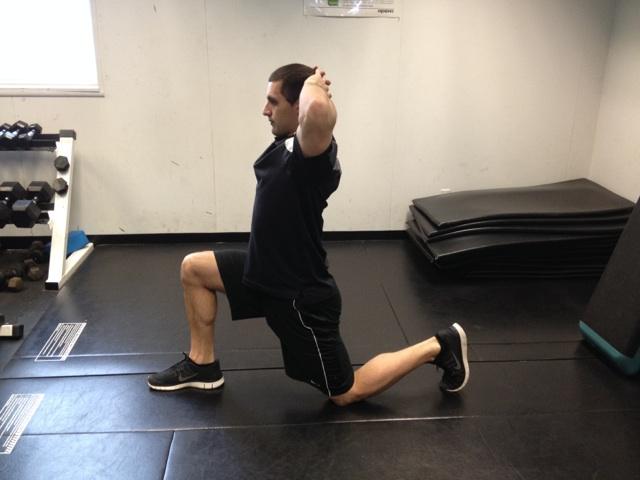
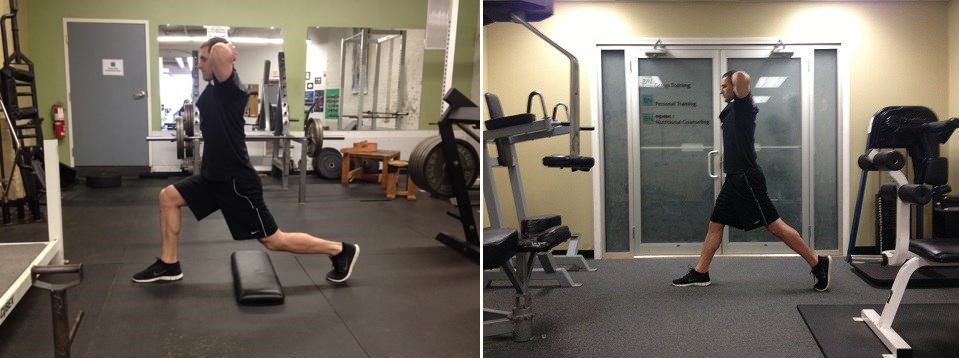
    Level One: Bodyweight Split Squats

    Side view

    Bodyweight Split Squat (Side Top)

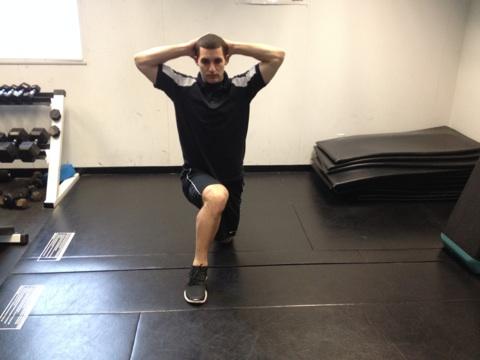
    Front view

    Bodyweight Split Squat (Front Top)

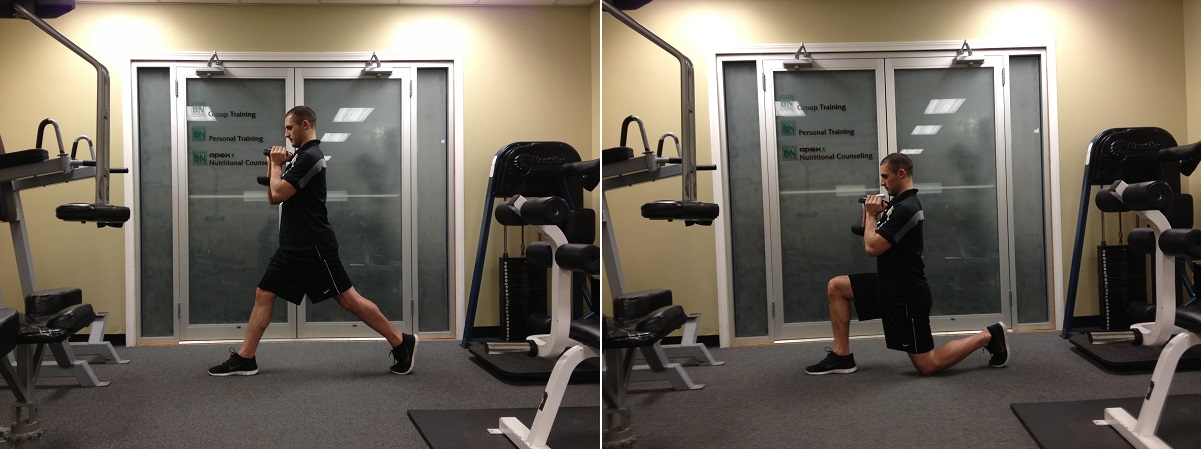
    Level Two: Goblet Split Squats

    Goblet Squat (Side top)

    Level Three: Dumbbell Split Squats

    Dumbbell Split Squat (Side Top)

    Level Four: Barbell Split Squats

    Barbell Split Squat (Side Top)

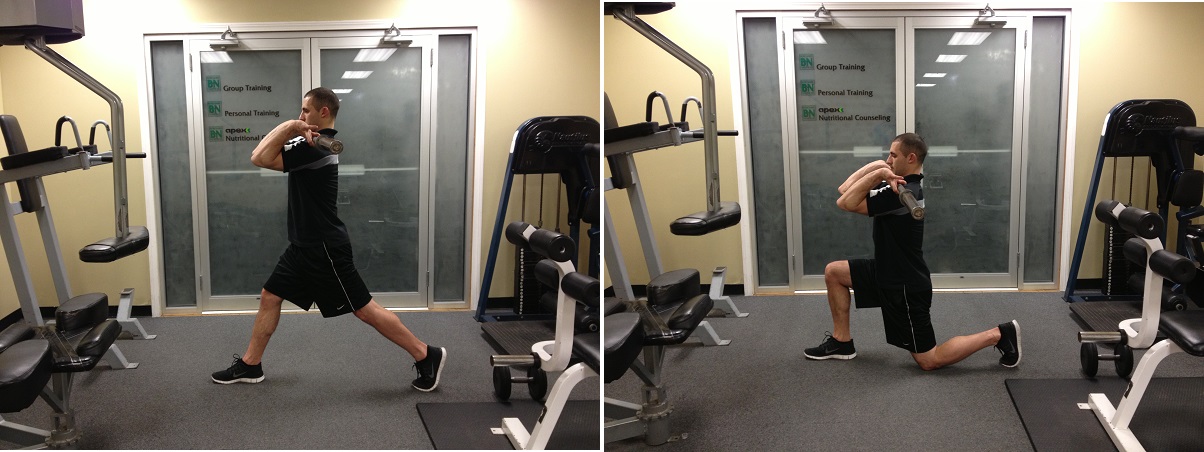
    Level Five: Front Loaded Barbell Split Squats

    Front Loaded Split Squat (Side Top)

    Now that you have all the regular split squat levels covered, I figure I might as well show you those same levels with the rear foot elevated. Let’s hop right into this.

    Rear Foot Elevated Split Squat Progression

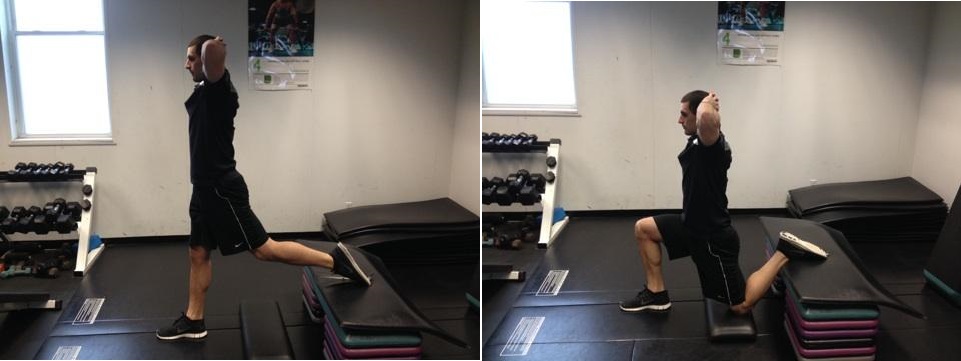
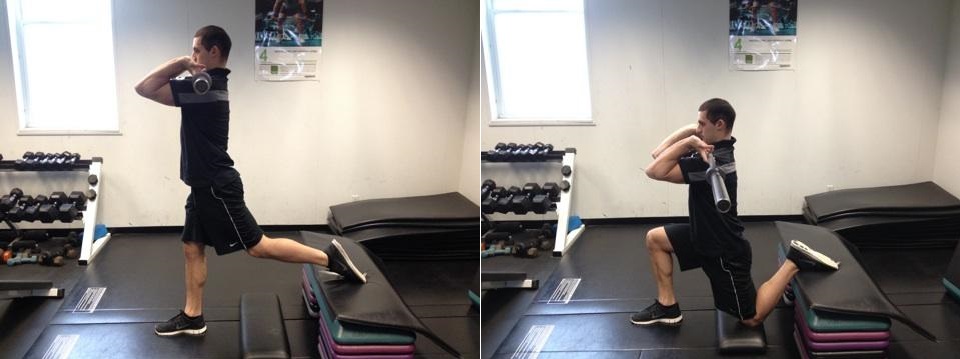
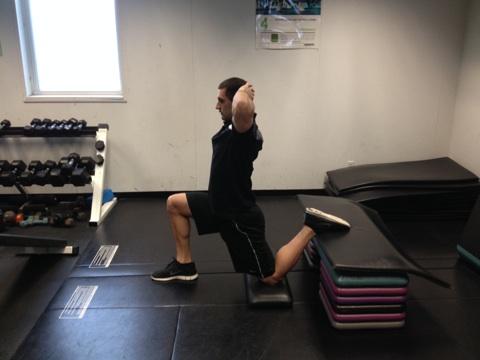
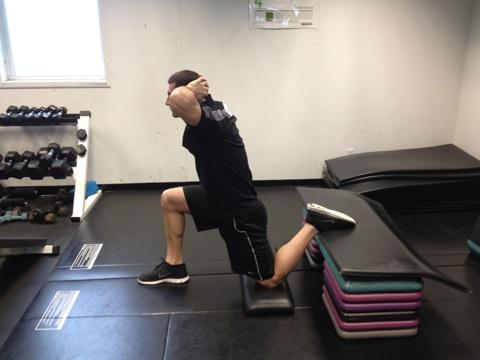
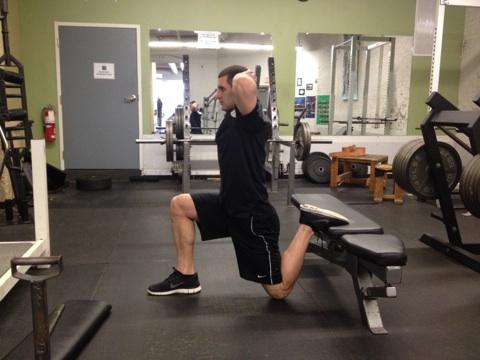
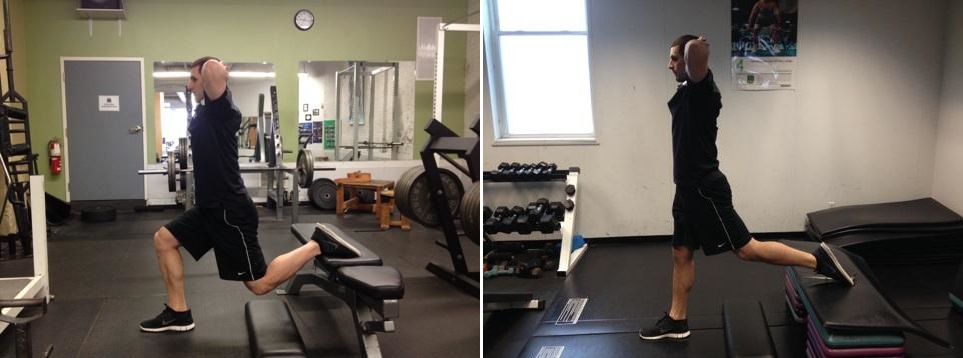
    Level One: Bodyweight Rear Foot Elevated Split Squats (RFESS)

    Bodyweight FRESS (Top Side) - Copy

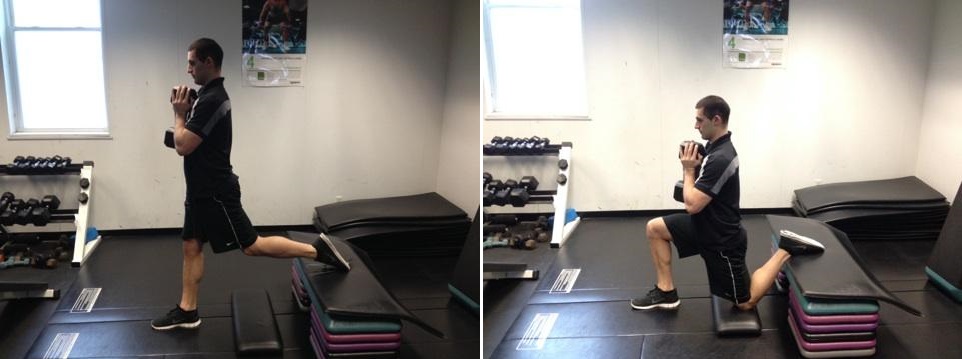
    Level Two: Goblet RFESS

    Goblet RFESS (Top Side)

    Level Three: Dumbbell RFESS

    Dumbbell RFES (Top Side)

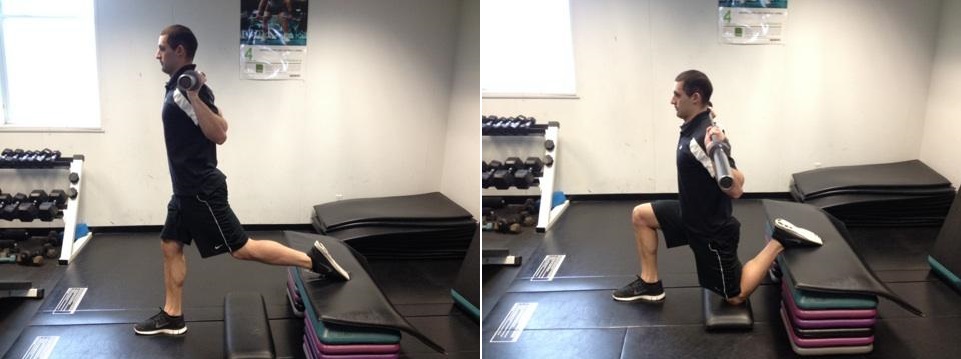
    Level Four: Barbell RFESS

    Back Loaded FRESS Top Side

    Level Five: Barbell Front Loaded RFESS

    Front Loaded RFESS (Top Side)

    Note: How to fix the mistakes I am about to tell is out of the context of this particular article. I am just making you aware of them in case you notice yourself falling into one of the categories. With that said here are…

    Six Extremely Common Split Squat Mistakes

    1.) The ribs are extended, or in simple terms the back is arched.

    Below is a demonstration of the ribs extended in a standard split squat. If you want to see proper rib and back position, refer to “level one” (the body weight split squat side view) above.

    Split squat extended

    Here is that same mistake with the rear foot elevated.

    Justin extended bodyweight split squat

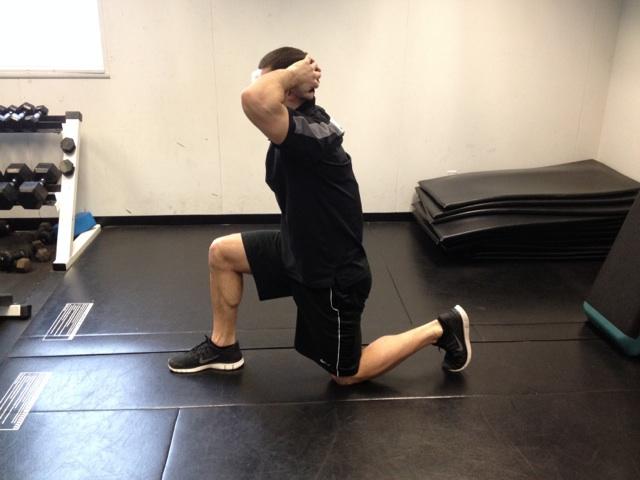
    2.) The upper back is rounded, or using proper terminology the thoracic spine is flexed.

    Below is a demonstration of the upper back rounding. This is usually accompanied with forward head posture as well.

    Split Squat Rounded

    Here is that same mistake with the rear foot elevated.

    RFESS rounded

    3.) Not using a pad of some sort for the bottom knee, AND OR slamming your knee to the ground and bouncing back up.

    Below you will see I am just dropping my knee to the ground without a pad. For obvious reasons, your patella (kneecap) will hate you for that direct trauma over time if it doesn’t immediately.

    No Knee to pad

    Here is what that same mistake looks like with the rear foot elevated.

    Knee to ground RFESS

    4.) Knee valgus or knees collapsing inward.

    Below you will see my knee isn’t in line with my ankle, but instead collapsed inward. If you want to see correct knee alignment, refer to “level one” (the body weight split squat front view) above.

    Knee Valgus

    Here is that same mistake with the rear foot elevated.

    5.) Using partial range of motion ALL THE TIME.

    I’m not saying to never use partial range of motion as part of your program, I just feel you must be able to use full range of motion at whatever “level” you perform FIRST, before you are allowed to use partial at it. This keeps you from “cheating the system” and evenly strong throughout each entire movement.

    Here is what partial range of motion would look like with the split squat. You would go down and up without touching the knee…

    Partial range of motion split squat

    Here is what partial range of motion looks like with the rear foot elevated. Again you are avoiding touching the knee.

    Partial range of motion RFESS

    6.) Trying to progress too quickly.

    For example, if you cannot perform level one with proper technique do not move onto level two. On the other hand if you can perform level one confidently and correctly move onto level two. Since I didn’t include any more regressions in this post I will give you one more quickly below as a bonus.

    Regression split squt

    You will see in the picture above the weight is assisting you, so the more you use as counterweight the easier the split squat. Only once this is performed properly with good body control you are more than welcome to move onto the next level. A table, pole or anything in front of you or by your side will do.

    Even though there are many more split squat variations you can implement and choose from, I included these because you can perform them at almost any training facility you step foot into. Again like in my work your way up the squatting scale article here, I find this to be a very simple logical progression no matter what client I come across. Once you master one level you can move to the next. I also posted this because I want to see more people work their way up the split squat scale safely and effectively. Whether you are an experienced lifter or beginner, rotate each type of split squat to switch up your program and challenge your body with some variability.

  • This Way of Thinking Changed My Life (Part One)

    This Way of Thinking Changed My Life (Part One)

    “When things go wrong, don’t go with them.”- Elvis Presley

    Michael Jordan, Babe Ruth, Emily Dickenson, Abraham Lincoln, Jerry Seinfeld and almost every other person you know has failed before they got to where they are today. Every person I have ever met, worked with, or talked to has failed in one way (or 100, or more) before they reached their goals. I don’t like the word failure. I think it is one of the most misunderstood and improperly used words to exist. It’s right up there with the word “hard” which I think should be changed to “doable”. But getting back to the word failure, I’ll let Thomas Edison explain one reason why we interpret and utilize this term so poorly before we move on.

    •  “I have not failed. I’ve just found 10,000 ways that won’t work.”- Thomas A. Edison
    • “Many of life’s failures are people who did not realize how close they were to success when they gave up.”-Thomas A. Edison

    Let’s Relate This to Fitness

    For example, what if you go on a fat loss plan for a couple months and you don’t lose any weight or lower your body fat percentage at all. Let’s say you try ten different programs and still nothing. You’re left feeling upset, disappointed, and as if there is no hope. Have you failed or can you learn from this particular “fault”? If you keep “failing” at anything, ask yourself these three questions very carefully.

    1. When, where, and why did I fail?
    2. At what point in my life did I fail?
    3. How will I prevent this “failure” from happening again?

    But please don’t kid yourself.

    If you are serious about getting results, then answer the questions above in the way you deserve too. Truthfully. Why? Because they will not work if you are lying to yourself. If you are not seeing results because you are not complying or putting in full effort to a program just say so. At least you know the real reason why you failed and you can still learn from that.

    It is impossible to live without failing at something, unless you live so cautiously that you might has well not have lived at all, in which case you have failed by default. – JK Rowling

    I absolutely love that quote. If you thin failures are bad, it’s going to make believing in yourself near impossible when you get knocked down. Mistakes happen, and as you already know they will keep happening for the rest of your life. Fail the right way,  which is by going after what you want.

    I believe you should indeed let failures affect you, but not destroy you. Embrace them, love them, and be grateful for their limitations. Failures are temporary and can only go so far and last so long. They can’t resist success. Think about it…

    Imagine what would happen if health care providers quit when a treatment wasn’t working. The possibility of finding a solution is impossible. In the same sense, if you quit when going after a goal, the possibility of “winning” is non existent. Do you agree that then you will never know what you could have achieved if you don’t at least try? This is what sets the average and the successful apart.

    Failures and how you deal with them are the foundation to the person that you become.

    You see, if you don’t give what you want to a shot, you never know if you could have stricken gold. Would you rather win, lose, or say you didn’t try weeks, months, years, or decades from now? I don’t now about you but I don’t want to have any regrets at all in the one life I am given. We usually hear that we don’t try things because we are afraid of failing.

    I also think you should ask yourself if you are afraid of the APPEARANCE of failing. If you were in your room alone and nobody could see you fail at the task you set out for, would you still be scared to go after your dreams and goals?

    Don’t think like the people that believe you can’t start a business during the recession. The people that think motivated people can’t turn phenomenal. The people that say things are impossible because they aren’t you. They aren’t capable of what you are. Remember, being born means that you were made to grow and to live life to the fullest. Don’t let failures kill you. Don’t let failures destroy your dreams. When something bad happens look at the good first, then look at the bad and decide how you’re going to fix it. Deep down you know there is always more out there. Do me a favor and remind yourself of this everyday.

    P.S. If you were to die tomorrow, would you have achieved everything you wanted?

    Don’t be a pessimist. We all recognize the same situation, bad or good, effects different people different ways. Our lives are most effected by the way we think things are, not the way they are. As you think, so you become. From now on what I want you to take away from this post is that you didn’t “fail”.

    Stop living cautiously and safely and instead live wisely and venturesome. Only you can control your own thoughts, and if you decide not too someone else will. We don’t want to live a scared, protective, boring life, we want to live an exciting intrepid one.

  • You Probably Don’t Use This Style of Training But You Should

    You Probably Don’t Use This Style of Training But You Should

    In this article you will learn…

    1. What tempo training is.
    2. How and why to utilize it.
    3. Mistakes and corrections in the application of it.

    Tempo Training: “The Break Down”

    In simple terms, coming from a musician, tempo is defined as the speed or pace of a given “piece”. In a fitness sense, it’s the speed or pace of a given “exercise”.  Although every movement we perform has a specific tempo naturally and without thinking, manipulating and/or paying attention to it is something you may benefit from.

    What do the numbers mean?

    This is how the parameters of an exercise are usually set up. Today we’re looking at the italicized tempo portion.

    Exercise: Back squats
    Sets: 5
    Reps: 3
    Rest time: 120-180 seconds
    Tempo: 6-3-2-2

    The first number (6) is the eccentric or lowering portion of the exercise: Here the muscle is lengthening while its getting worked. For example, this would be the lowering of a bar during a bench press, or the straightening of your arm while performing a biceps curl.

    The second number (2) represents the pause in between the lowering and lifting portion of the exercise. This pause usually happens between the eccentric (lowering) phase and the concentric (lifting) phase of a repetition. An example would be when the bar is nearest your chest in the bench press, or when the arm is fully extended during a bicep curl.

    The third number (3) is the concentric, or lifting portion of the exercise: The concentric contraction occurs when the muscle is shortening. Examples of this would be the pushing movement of the bar during a bench press, or the flexing (bending) of your elbow during a biceps curl.

    The fourth number (2) explains the pause at the top, if you choose to include that: The contraction happens at the end of your concentric (lifting) portion. Examples would be at the top or lockout position with the arms straight at the top of the bench press, or when your elbow is fully bent at the top of a biceps curl.

    Note:

    • If you want to use, or see someone uses an (X) it means to perform that phase of the movement as fast as possible.
    • If you want to use, or see someone uses a (0) it means you spend no time pausing at either the top or bottom of the exercise.

    Tempo training can be implemented to achieve all types of goals. You can use it too…

    Increase your strength and power

    https://www.instagram.com/p/61AbrsxMVZ/?taken-by=justinrivelli

    Increase muscle hypertrophy (muscle growth)

    You can manipulate tempo to increase things like metabolic stress (the burning feeling when you train), mechanical tension (in simple terms using the heaviest loads you can handle) and or to increase muscle damage (by using a long eccentric contraction or unfamiliar movements).

    Identify weaknesses, correct poor technique, or help with problem areas throughout an exercise. 

    By using different tempo’s (whether they are fast, paused, or slow) it enables you to see and feel certain positions and problem areas throughout the four phases of an exercise. This way you can gain better awareness of your body in space.

    Improve body control, technique, and quality of movement.

    For example if you struggle keeping a neutral spine near the bottom of a stiff legged deadlift, I could change the tempo so that you spend more time there to either create more confidence, strength, or familiarity in that position. I can even do it to give you a greater return of proper technique for the future.

    Be aware of counting too fast.

    Being a drummer my whole life I like to think I have a great sense of time and tempo. What I often notice is that because using slower tempos is challenging, people count inconsistently, and quicker than they think they are.

    So how do you fix this?

    1. You can look at or listen to a stopwatch or metronome, which sometimes can get annoying.
    2. Have someone count for you, which will require a partner.
    3. Count slower with one-one thousand, two-one thousand, three-one thousand.

    Or what I have also seen work great is…

    1. Check and re-check an actual stopwatch from time to time, to make certain you are accurately counting the number of seconds properly.
    2. Double the amount of time you want to perform, to ensure you’re counting slow enough.

    The ways you can use tempo training are endless.

    Here are a couple videos of me applying some different tempos.

    Tempo training will give you a greater appreciation of an exercise, especially if you are getting bored and need to step out of some old habits. Pick a primary goal and execute numbers appropriately. If you need help with something specific, feel free to comment or message me.