Tag: technique

  • Work Your Way Up The Split Squat Scale

    Work Your Way Up The Split Squat Scale

    Like in my work your way up the squatting scale article, this post is straightforward and easy to understand. In it I will explain…

    • How to “level up” your split squats or rear foot elevated split squats (RFESS). By this I mean…
    • If you can perform level one easily and correctly, then you are warranted to move on to level two. If you can perform level two easily and correctly, you are given the right to move onto level three etc.
    • The most common mistakes I see when it comes to performing any split squat variation.

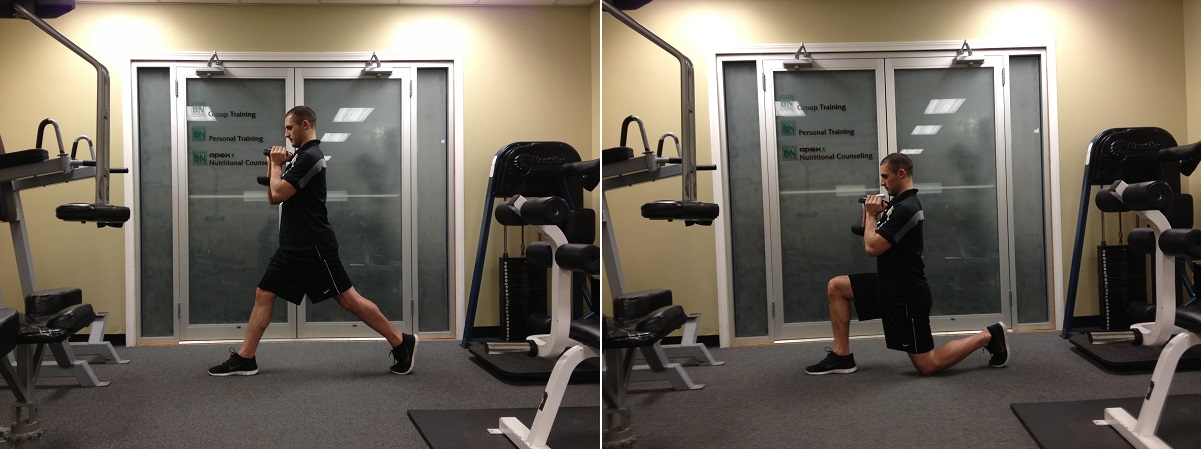
    Level One: Bodyweight Split Squats

    Side view
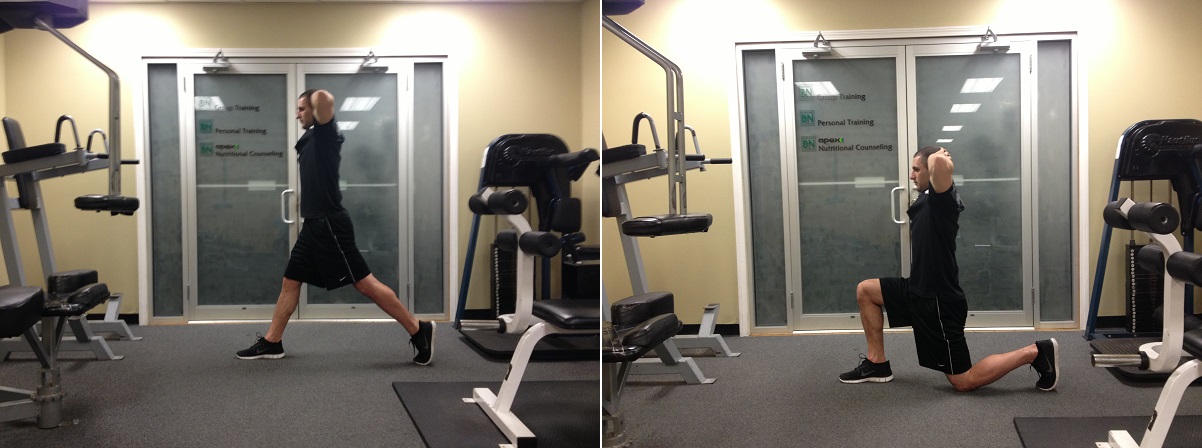
    Bodyweight Split Squat (Side Top)

    Front view

    Bodyweight Split Squat (Front Top)

    Level Two: Goblet Split Squats

    Goblet Squat (Side top)

    Level Three: Dumbbell Split Squats

    Dumbbell Split Squat (Side Top)

    Level Four: Barbell Split Squats

    Barbell Split Squat (Side Top)

    Level Five: Front Loaded Barbell Split Squats
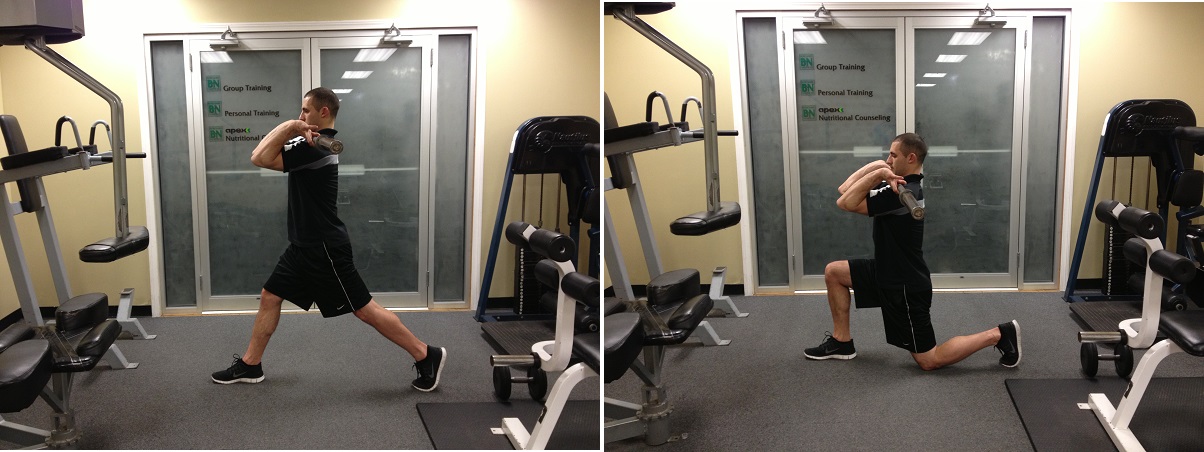
    Front Loaded Split Squat (Side Top)

    Now that you have all the regular split squat levels covered, I figure I might as well show you those same levels with the rear foot elevated. Let’s hop right into this.

    Rear Foot Elevated Split Squat Progression

    Level One: Bodyweight Rear Foot Elevated Split Squats (RFESS)
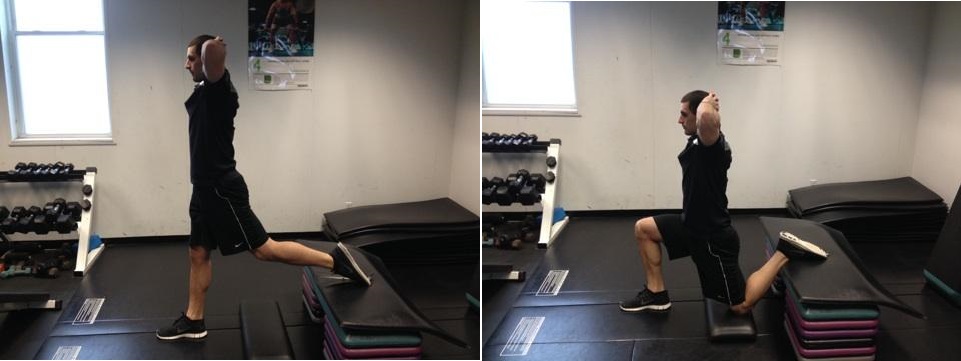
    Bodyweight FRESS (Top Side) - Copy

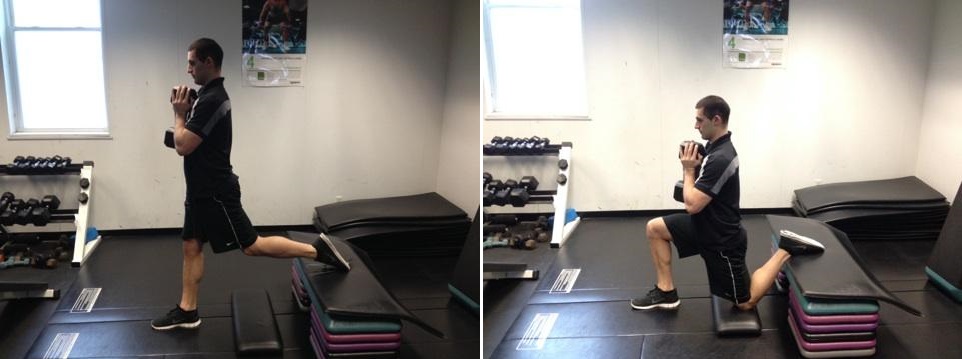
    Level Two: Goblet RFESS

    Goblet RFESS (Top Side)

    Level Three: Dumbbell RFESS

    Dumbbell RFES (Top Side)

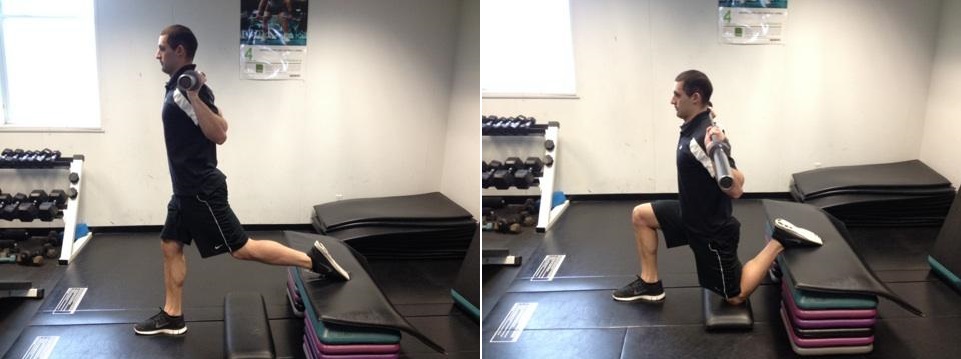
    Level Four: Barbell RFESS

    Back Loaded FRESS Top Side

    Level Five: Barbell Front Loaded RFESS
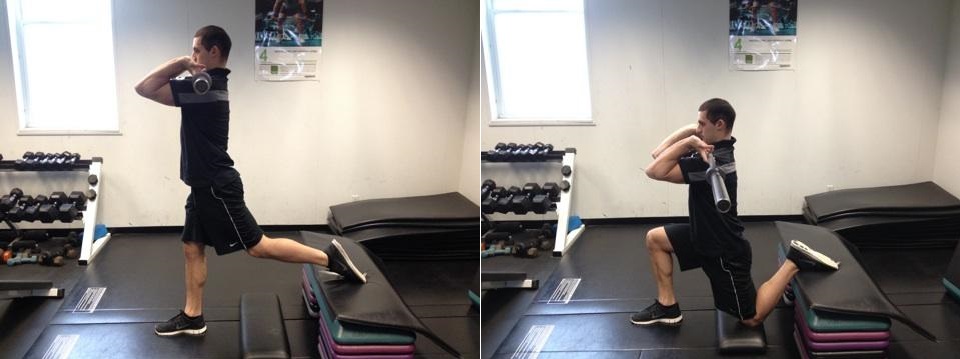
    Front Loaded RFESS (Top Side)

    Note: How to fix the mistakes I am about to tell is out of the context of this particular article. I am just making you aware of them in case you notice yourself falling into one of the categories. With that said here are…

    Six Extremely Common Split Squat Mistakes

    1.) The ribs are extended, or in simple terms the back is arched.

    Below is a demonstration of the ribs extended in a standard split squat. If you want to see proper rib and back position, refer to “level one” (the body weight split squat side view) above.
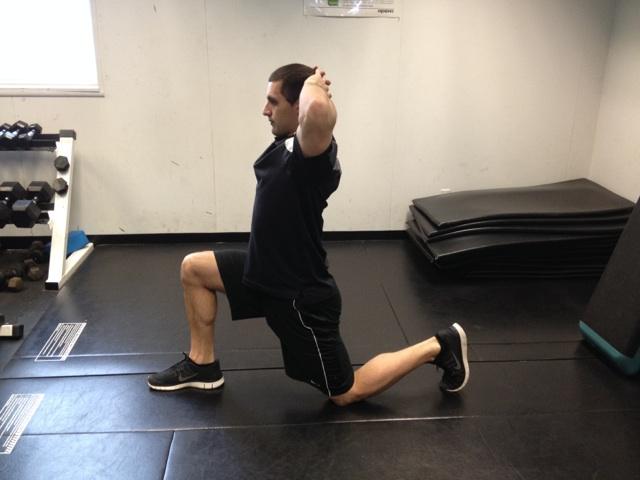
    Split squat extended

    Here is that same mistake with the rear foot elevated.
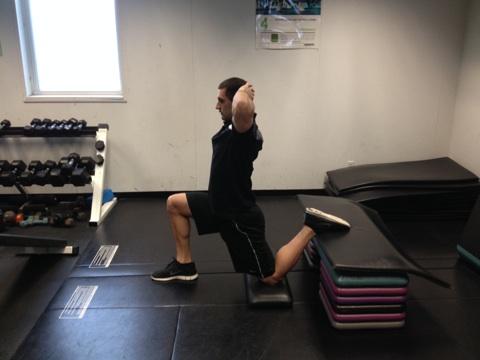
    Justin extended bodyweight split squat

    2.) The upper back is rounded, or using proper terminology the thoracic spine is flexed.

    Below is a demonstration of the upper back rounding. This is usually accompanied with forward head posture as well.
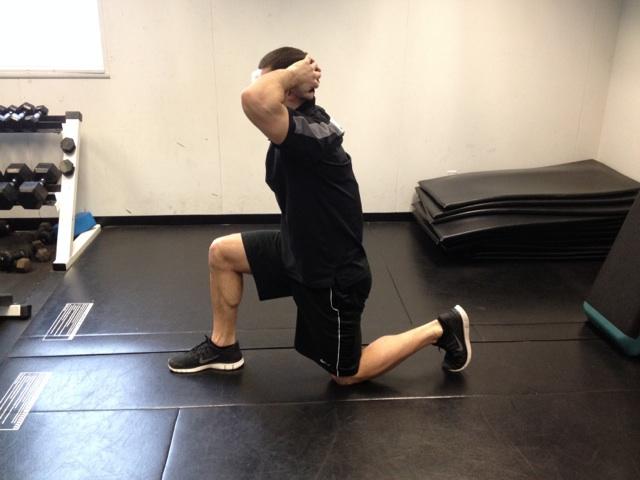
    Split Squat Rounded

    Here is that same mistake with the rear foot elevated.
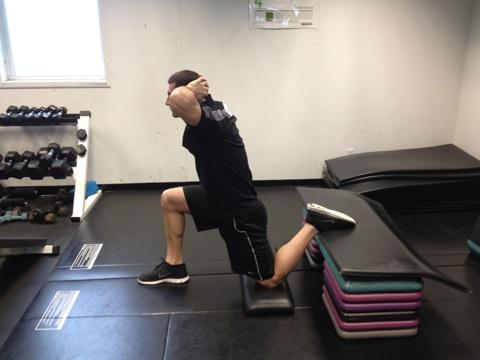
    RFESS rounded

    3.) Not using a pad of some sort for the bottom knee, AND OR slamming your knee to the ground and bouncing back up.

    Below you will see I am just dropping my knee to the ground without a pad. For obvious reasons, your patella (kneecap) will hate you for that direct trauma over time if it doesn’t immediately.

    No Knee to pad

    Here is what that same mistake looks like with the rear foot elevated.
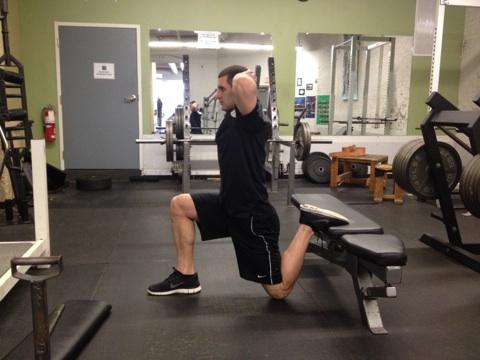
    Knee to ground RFESS

    4.) Knee valgus or knees collapsing inward.

    Below you will see my knee isn’t in line with my ankle, but instead collapsed inward. If you want to see correct knee alignment, refer to “level one” (the body weight split squat front view) above.
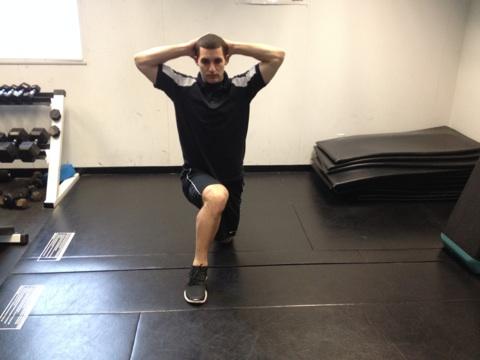
    Knee Valgus

    Here is that same mistake with the rear foot elevated.

    5.) Using partial range of motion ALL THE TIME.

    I’m not saying to never use partial range of motion as part of your program, I just feel you must be able to use full range of motion at whatever “level” you perform FIRST, before you are allowed to use partial at it. This keeps you from “cheating the system” and evenly strong throughout each entire movement.

    Here is what partial range of motion would look like with the split squat. You would go down and up without touching the knee…
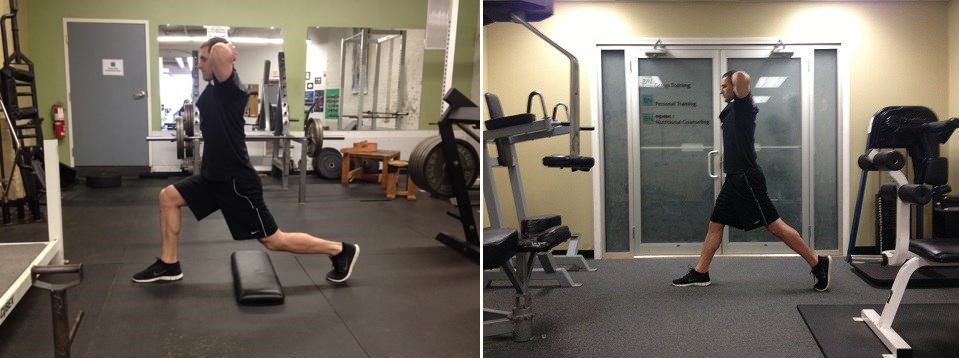
    Partial range of motion split squat

    Here is what partial range of motion looks like with the rear foot elevated. Again you are avoiding touching the knee.
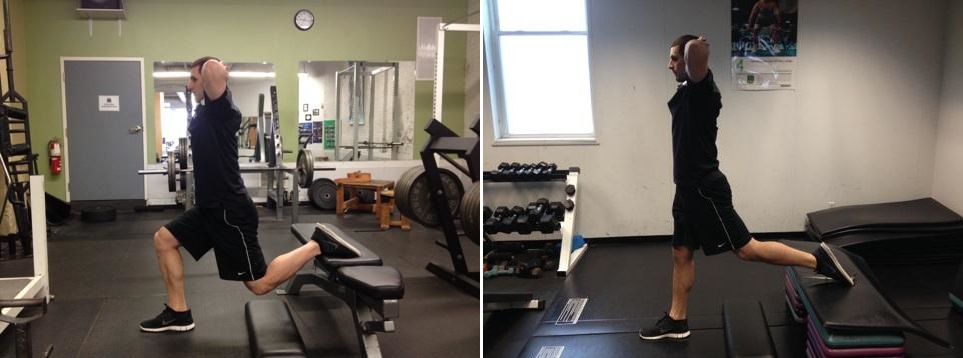
    Partial range of motion RFESS

    6.) Trying to progress too quickly.

    For example, if you cannot perform level one with proper technique do not move onto level two. On the other hand if you can perform level one confidently and correctly move onto level two. Since I didn’t include any more regressions in this post I will give you one more quickly below as a bonus.

    Regression split squt

    You will see in the picture above the weight is assisting you, so the more you use as counterweight the easier the split squat. Only once this is performed properly with good body control you are more than welcome to move onto the next level. A table, pole or anything in front of you or by your side will do.

    Even though there are many more split squat variations you can implement and choose from, I included these because you can perform them at almost any training facility you step foot into. Again like in my work your way up the squatting scale article here, I find this to be a very simple logical progression no matter what client I come across. Once you master one level you can move to the next. I also posted this because I want to see more people work their way up the split squat scale safely and effectively. Whether you are an experienced lifter or beginner, rotate each type of split squat to switch up your program and challenge your body with some variability.
  • You Must Learn This Before You Start Training (For Ladies and Gentlemen)

    You Must Learn This Before You Start Training (For Ladies and Gentlemen)

    In this article I’m going to teach you three things…

    1.  Why you need to learn the hip hinge before you begin any type of training program..
    2.  The mistakes I come across in just about every client when coaching it.
    3.  How to correct these exact errors.

    WHY LEARN THE HIP HINGE?

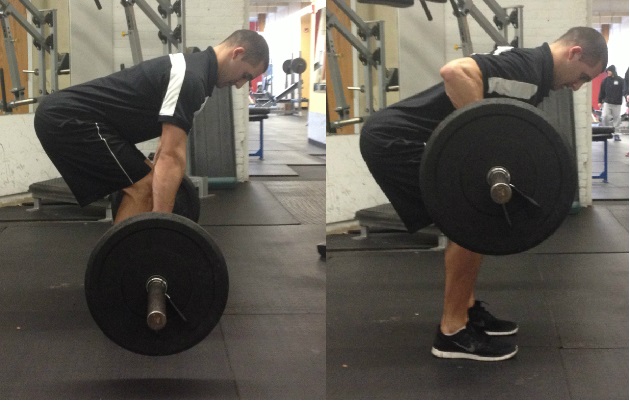
    If you cannot perform a proper hip hinge, you should not be attempting some of the most important and popular exercises being taught or performed today. These include the deadlift, kettlebell swings, and rowing variations etc.

    In person, I rarely work with someone that can initially perform a good hip hinge.  Without question it usually takes in depth proper teaching, practice, grooving and loading to understand. In simple terms it takes repetition. Actually, proper repetition with the objective to get better is more like it.

    The hip hinge is often overlooked in training facilities, rehab centers, and in everyday life. I cannot believe more personal trainers, athletic trainers, physical therapists, chiropractors, and orthopedics, etc. do not make sure they themselves and their clients or patients know how to perform it.

    Since no amount of treatment or therapeutic modality is going to cure this movement, I believe it is my job to teach every single one of you how to do it. It’s not only appropriate but necessary you can feel the difference between loading a movement through your spine (and other unwanted areas), and loading a movement through more appropriate places like your hips and hamstrings.

    Whether you are picking up something up and putting it down, shoveling, tying your shoes, or getting up from a toilet seat, a proper hip hinge will spare you the repetitive unwanted trauma that will lead to inefficiency and injury.

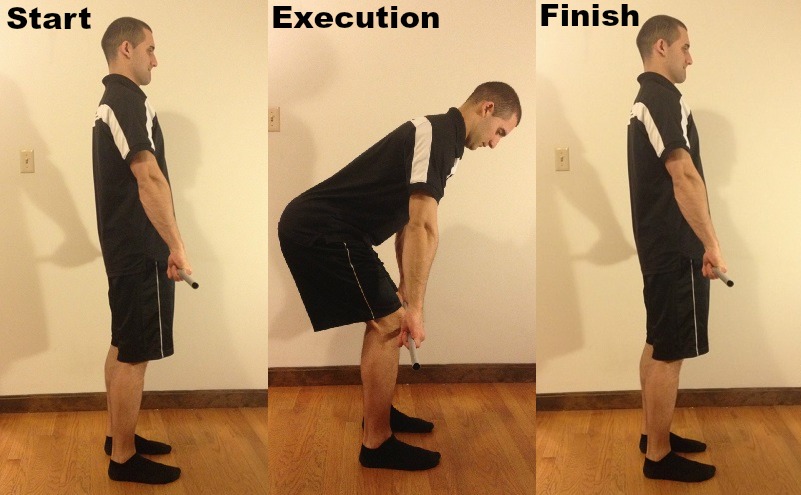
    Here is what a good hip hinge looks like before I present, assess, and correct common mistakes of it.

    pic monk hing

    HERE ARE FOUR COMMON MISTAKES OF THE HIP HINGE ND HOW TO CORRECT THEM:

    Problem One: The hinge isn’t a squat. 

    Hip Hinging involves reaching the hips back, not dropping the butt down. Dropping the butt down, causes your weight to translate forward, not back.

    Hip Hinge Mistake One


    If you stood with your knees against an object, they would hit it, or you would push it forward. This is incorrect. See what I am talking about in the video below.

    SOLUTION!

        1. Imagine taking a bow, not a curtsey.
        2. Picture someone is standing behind you, wrapped a rope around your waist, and is pulling you backwards
        3. Have a partner stand in front of you, put their hands on the front of your hips (ASIS), and push you backwards as you perform the hinge. If you don’t have a partner, karate chop your own hips while doing this.
        4. Place an object in front of you and don’t let your knees come forward
        5. You should feel your glutes and hamstrings (back of your thighs) loaded and stretched.

    If you were standing in front of an object and performing it correctly, your knees wouldn’t touch it at all. Look below to see a hip hinge where the hips are reaching back, but not dropping down:

    Or you could even do this next to a wall to help fix your butt dropping problem.

    Problem Two (s): Legs remain straight throughout the entire movement, excessive rounding or arching occurs, butt doesn’t go back.

    In layman’s terms, excessively rounding or arching the back is not favorable for long term bone, or joint health. This is usually accompanied with straight knees, and the butt not going back as well.

    Hyperextended Knees and Lmbar Flexion


    SOLUTION!

        1. Stand close to a wall and put a dowel rod in between your elbow pits (cubital fossa) behind your back.
        2. Reach your butt back to the wall.
        3. Move further away from the wall as you progress.

    dowelrod behind back use


    Problem Three: Using your lower back, not your hips to finish the lift.

    The first mistake I see in this category is “leaning back”. This is where people use lumbar (lower back) extension, instead of hip extenison. The second mistake I see is where people do not use hip extension or their glutes at all. They are both shown in the pictures below.


    Solution:

        • Stand up tall
        • Squeze your glutes/pinch a penny between your butt cheeks
        • Push your hips through.
        • Hump the air.
        • Lock out your knees and hips
        • Keep the ribs down/abdominals tight
        • Get tight like your about to get hit by a bus

    Proper Hip Extension


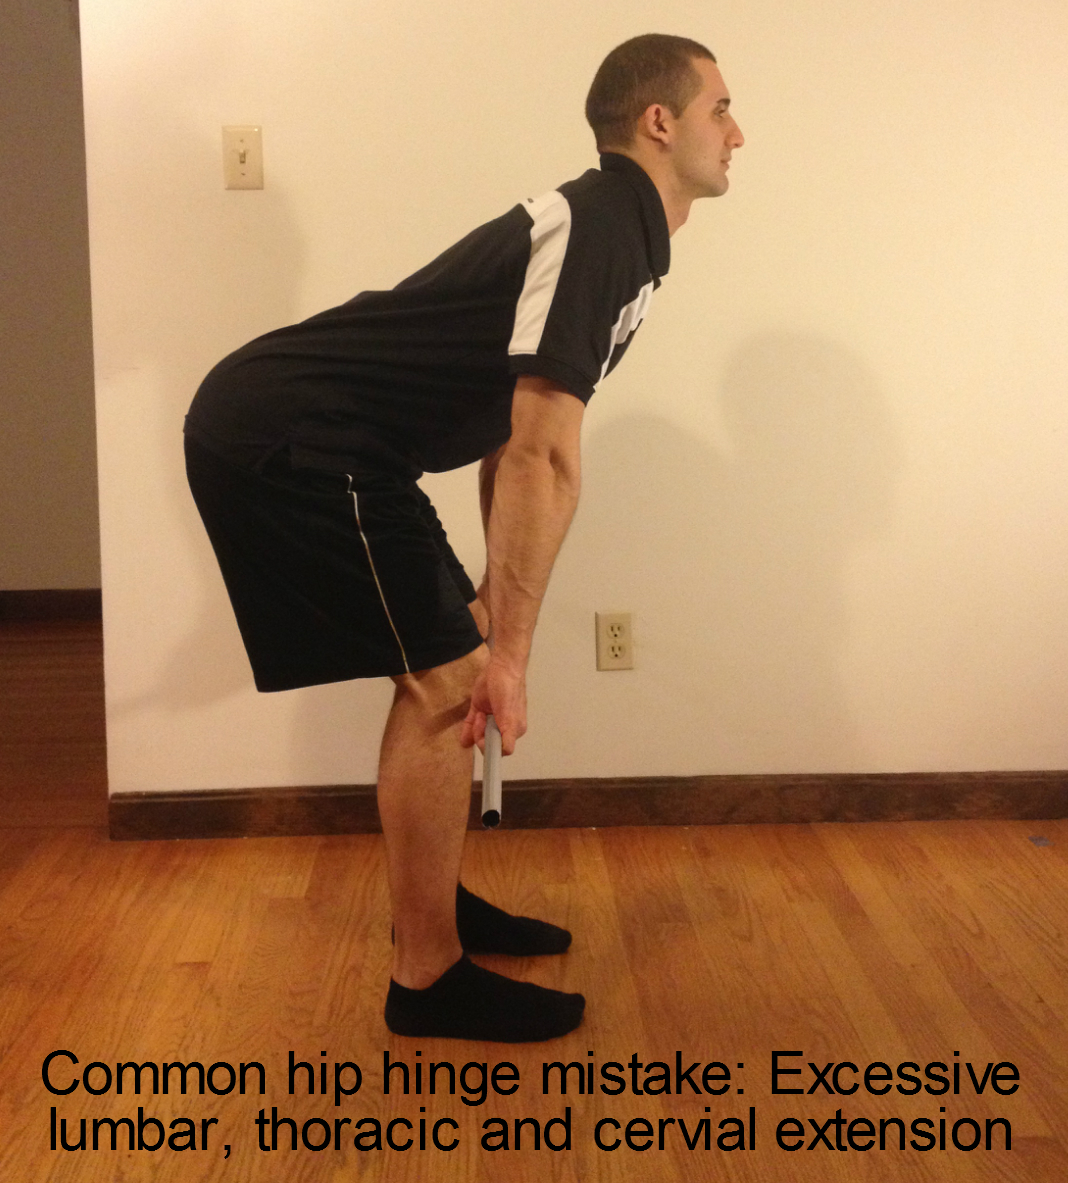
    Problem Four: Hyperextending the low back, upper back, and or neck.

    This might be less serious than the other problems for the majority of the population, especially seeing some coaches teach this position on purpose. But for the most part learning neutral alignment instead of hyperextending everything is a smarter safer choice. It’ll not only help with performance of other lifts, but create awareness of positioning as well.

    Lumbar, thoracic and cervial


    Solution: 

    1. Place a dowel rod, tick, broom, or whatever you have onto your back.
    2. Perform the hip hinge.
    3. During the movement make sure it maintains contact with the following three places. The back of your head (occipital region), in between your shoulder blades (scapula), and your tailbone (sacrum).
    4. If you lose contact, something is out of alignment. To correct it, just reassure the dowel rod is in contact with the three areas mentioned above.


    If you stuck with me this long so far, thats great! Now let’s take a quick look at some exercises that involve the hip hinge I taught you above. I left out pictures of kettlebell swings,  good mornings and certain Olympic lifts etc. Just note exercises other than the ones presented below will require you know the hip hinge in order to be performed.

    Bent over barbell rowing:


    Bent Over Rear Deltoid Raises:

    Rear Delt Raises Bottom

    Stiff Legged Deadlifts:


    And finally, a short clip of the conventional deadlift using the hip hinge correctly.

    By learning the hip hinge you will not only enhance your physique and performance, but prevent injury and increase your training years more than you can imagine. It will also help you look like you’re an advanced trainee, lifter, gym rat or whatever you want to call it. Whether you’re at a gym, moving a sofa, picking up grocery bags, or playing with your child at a bouncy house, you will be a master of this movement anywhere you go if you implement what I just showed you.

    P.S. If and only if this post helps you please feel free to share it with anyone you believe could benefit from it.